Oracle Announces General Availability of Oracle Database 12c, the First Database Designed for the Cloud
As organizations embrace the cloud, they seek technologies that will transform business and improve their overall operational agility and effectiveness. Oracle Database 12c is a next-generation database designed to meet these needs, providing a new multitenant architecture on top of a fast, scalable, reliable, and secure database platform. By plugging into the cloud with Oracle Database 12c, customers can improve the quality and performance of applications, save time with maximum availability architecture and storage management and simplify database consolidation by managing hundreds of databases as one.
Download Oracle Database 12C
The latest generation of the world’s #1 database, Oracle Database 12C, is available for download from Oracle Technology Network (OTN).
Oracle Database 12c Release 1
Standard Edition, Standard Edition One, and Enterprise Edition (12.1.0.1.0).
http://www.oracle.com/technetwork/database/enterprise-edition/downloads/index.html
Setup Size:- 2.5GB zip file.
oracle 12c database architecture


12c New features
How to truncate a master table while child tables contain data
Limiting ROWS for Top-N query results
Miscellaneous SQL*Plus enhancements
Session level sequences
WITH clause improvements
Extended data types
Table partition maintenance enhancements
Database upgrade improvements
Restore/Recover data file over the network
Data Pump enhancements
Real-time ADDM
Concurrent statistics gathering
Online migration of an active data file
Online table partition or sub-partition migration
Invisible column
Multiple indexes on the same column
DDL logging
Temporary undo in- and- outs
New backup user privilege
How to execute SQL statement in RMAN
Table level recovery in RMAN
Restricting PGA size
Additions/Enhancements in ASM
Additions/Enhancements in Grid Infrastructure
Additions/Enhancements in Real Application Cluster (database)
Truncate table CASCADE
In the previous releases, there wasn’t a direct option provided to truncate a master table while it is referred to by the child tables and child records exist. The TRUNCATE TABLE with CASCADE option in 12c truncates the records in the master table and automatically initiates recursive truncate on child tables too, subject to foreign key reference as DELETE ON CASCADE. There is no CAP on the number of recursive levels as it will apply on all child, grand child and great grandchild etc.This enhancement gets rid of the prerequisite to truncate all child records before truncating a master table. The new CASCADE clause can also be applied on table partitions and sub-partitions etc.
SQL> TRUNCATE TABLE <table_name> CASCADE;

SQL> TRUNCATE TABLE <table_name> PARTITION <partition_name> CASCADE;
An ORA-14705 error will be thrown if no ON DELETE CASCADE option is defined with the foreign keys of the child tables.
ROW limiting for Top-N result queries
There are various indirect approaches/methods exist to fetch Top-N query results for top/bottom rows in the previous releases. In 12c, retrieving Top-N query results for top/bottom rows simplified and become straight forward with the new FETCH FIRST|NEXT|PERCENT clauses.In order to retrieve top 10 salaries from EMP table, use the following new SQL statement:
SQL> SELECT eno,ename,sal FROM emp ORDER BY SAL DESC
    FETCH FIRST 10 ROWS ONLY;
The following example fetches all similar records of Nth row. For
example, if the 10th row has salary of 5000 value, and there are other
employees whose salary matches with the Nth value, the will also be
fetched upon mentioning WITH TIES clause.SQL> SELECT eno,ename,sal FROM emp ORDER BY SAL DESC
FETCH FIRST 10 ROWS ONLY WITH TIES;
The following example limits the fetch to 10 per cent from the top salaries in the EMP table:SQL> SELECT eno,ename,sal FROM emp ORDER BY SAL DESC
FETCH FIRST 10 PERCENT ROWS ONLY;
The following example offsets the first 5 rows and will display the next 5 rows from the table:SQL> SELECT eno,ename,sal FROM emp ORDER BY SAL DESC
OFFSET 5 ROWS FETCH NEXT 5 ROWS ONLY;
All these limits can be very well used within the PL/SQL block too.BEGIN
SELECT sal BULK COLLECT INTO sal_v FROM EMP
FETCH FIRST 100 ROWS ONLY;
END;
Miscellaneous SQL*Plus enhancements
Implicit Results on SQL*Plus: SQL*Plus in 12c returns results from an implicit cursor of a PL/SQL block without actually binding it to a RefCursor. The new dbms_sql.return_result procedure will return and formats the results of SELECT statement query specified within PL/SQL block. The following code descries the usage:SQL> CREATE PROCEDURE mp1
as
res1 sys_refcursor;
BEGIN
open res1 for SELECT eno,ename,sal FROM emp;
dbms_sql.return_result(res1);
END;
SQL> execute mp1;
When the procedure is executed, it return the formatted rows on the SQL*Plus.Display invisible columns: In Part 1 of this series, I have explained and demonstrated about invisible columns new feature. When the columns are defined as invisible, they won’t be displayed when you describe the table structure. However, you can display the information about the invisible columns by setting the following on the SQL*Plus prompt:
SQL> SET COLINVISIBLE ON|OFFThe above setting is only valid for DESCRIBE command. It has not effect on the SELECT statement results on the invisible columns.
Session level sequences
A new SESSION level database sequence can be created now in 12c to support the session level sequence values. These types of sequences are most useful and suitable on global temporary tables that have session level existence.Session level sequences produce a unique range of values that are limited within the session, not across the sessions. Once the session ends, the state of the session sequences also goes away. The following example explains creating a session level sequence:
SQL> CREATE SEQUENCE my_seq START WITH 1 INCREMENT BY 1 SESSION;

SQL> ALTER SEQUENCE my_seq GLOBAL|SESSION;
The CACHE, NOCACHE, ORDER or NOORDER clauses are ignored for SESSION level sequences.
WITH clause improvements
In 12c, you can have faster running PL/SQL function/procedure in SQL, that are defined and declared within the WITH clause of SQL statements. The following examples demonstrate how to define and declare a procedure or function within the WITH clause:WITH
PROCEDURE|FUNCTION test1 (…)
BEGIN
<logic>
END;
SELECT <referece_your_function|procedure_here> FROM table_name;
/
Although you can’t use the WITH clause directly in the PL/SQL unit, it can be referred through a dynamic SQL within that PL/SQL unit.Extended data types
In 12c, the data type VARCHAR2, NAVARCHAR2, and RAW size will support up to 32,767 bytes in contrast to 4,000 and 2,000 in the earlier releases. The extended character size will reduce the use of going for LOB data types, whenever possible. In order to enable the extended character size, you will have to set the MAX_STRING_SIZE initialization database parameter to EXTENDED.The following procedure need to run to use the extended data types:
- Shutdown the database
- Restart the database in UPGRADE mode
- Modify the parameter: ALTER SYSTEM SET MAX_STRING_SIZE=EXTENDED;
- Execute utl32k.sql as sysdba : SQL> @?/rdbms/admin/utl32k.sql
- Shutdown the database
- Restart the database in READ WRITE mode
Table partition maintenance enhancements
In Part I, I explained how to move a table partition or sub-partition to a different tablespace either offline or online. In this section, you will learn other enhancements relating to table partitioning.Adding multiple new partitions
Before Oracle 12c R1, it was only possible to add one new partition at a time to an existing partitioned table. To add more than one new partition, you had to execute an individual ALTER TABLE ADD PARTITION statement to every new partition. Oracle 12c provides the flexibility to add multiple new partitions using a single ALTER TABLE ADD PARTITION command. The following example explains how to add multiple new partitions to an existing partitioned table:SQL> CREATE TABLE emp_part
(eno number(8), ename varchar2(40), sal number (6))
PARTITION BY RANGE (sal)
(PARTITION p1 VALUES LESS THAN (10000),
PARTITION p2 VALUES LESS THAN (20000),
PARTITION p3 VALUES LESS THAN (30000)
);
Now lets add a couple of new partitions:SQL> ALTER TABLE emp_part ADD PARTITION PARTITION p4 VALUES LESS THAN (35000), PARTITION p5 VALUES LESS THAN (40000);In the same way, you can add multiple new partitions to a list and system partitioned table, provided that the MAXVALUE partition doesn’t exist.
How to drop and truncate multiple partitions/sub-partitions
As part of data maintenance, you typically either use drop or truncate partition maintenance task on a partitioned table. Pre 12c R1, it was only possible to drop or truncate one partition at a time on an existing partitioned table. With Oracle 12c, multiple partitions or sub-partitions can be dropped or merged using a single ALTER TABLE table_name {DROP|TRUNCATE} PARTITIONS command.The following example explains how to drop or truncate multiple partitions on an existing partitioned table:
SQL> ALTER TABLE emp_part DROP PARTITIONS p4,p5;
SQL> ALTER TABLE emp_part TRUNCATE PARTITONS p4,p5;
To keep indexes up-to-date, use the UPDATE INDEXES or UPDATE GLOBAL INDEXES clause, shown below:
SQL> ALTER TABLE emp_part DROP PARTITIONS p4,p5 UPDATE GLOBAL INDEXES;
SQL> ALTER TABLE emp_part TRUNCATE PARTITIONS p4,p5 UPDATE GLOBAL INDEXES;
If you truncate or drop a partition without the UPDATE GLOBAL INDEXES clause, you can query the column ORPHANED_ENTRIES in the USER_INDEXES or USER_IND_PARTITIONS dictionary views to find out whether the index contains any stale entries.
Splitting a single partition into multiple new partitions
The new enhanced SPLIT PARTITION clause in 12c will let you split a particular partition or sub-partition into multiple new partitions using a single command. The following example explains how to split a partition into multiple new partitions:SQL> CREATE TABLE emp_part
(eno number(8), ename varchar2(40), sal number (6))
PARTITION BY RANGE (sal)
(PARTITION p1 VALUES LESS THAN (10000),
PARTITION p2 VALUES LESS THAN (20000),
PARTITION p_max VALUES LESS THAN (MAXVALUE)
);
SQL> ALTER TABLE emp_part SPLIT PARTITION p_max INTO
(PARTITION p3 VALUES LESS THAN (25000),
PARTITION p4 VALUES LESS THAN (30000), PARTITION p_max);
Merge multiple partitions into one partition
You can merge multiple partitions to a single partition using a single ALTER TBALE MERGE PARTITIONS statement:SQL> CREATE TABLE emp_part (eno number(8), ename varchar2(40), sal number (6)) PARTITION BY RANGE (sal) (PARTITION p1 VALUES LESS THAN (10000), PARTITION p2 VALUES LESS THAN (20000), PARTITION p3 VALUES LESS THAN (30000), PARTITION p4 VALUES LESS THAN (40000), PARTITION p5 VALUES LESS THAN (50000), PARTITION p_max (MAXVALUE) ); SQL> ALTER TABLE emp_part MERGE PARTITIONS p3,p4,p5 INTO PARTITION p_merge;If the range falls in the sequence, you can use the following example:
SQL> ALTER TABLE emp_part MERGE PARTITIONS p3 TO p5 INTO PARTITION p_merge;
Database upgrade improvements
Whenever a new Oracle version is announced, the immediate challenge that every DBA confronts is the upgrade process. In this section, I will explain the two new improvements introduced for upgrading to 12c.Pre-upgrade script
A new and much improved pre-upgrade information script, preupgrd.sql, replaces the legacy utlu[121]s.sql script in 12c R1. Apart from the preupgrade checks verification, the script is capable of addressing the various issues – in the form of fixup scripts – that are raised during the pre-post upgrade process.The fixup scripts that are generated can be executed to resolve the problems at different levels, for example, pre-upgrade and post upgrade. When upgrading the database manually, the script must be executed manually before initiating the actual upgrade procedure. However, when the Database Upgrade Assistant (DBUA) tool is used to perform a database upgrade, it automatically executes the pre-upgrade scripts as part of the upgrade procedure and will prompt you to execute the fixup scripts in case of any errors that are reported.
The following example demonstrates how to execute the scripts:
SQL> @$ORACLE_12GHOME/rdbms/admin/preupgrd.sqlThe above script generates a log file and a [pre/post]upgrade_fixup.sql script. All these files are located under the $ORACLE_BASE/cfgtoollogs directory. Before you continue with the real upgrade procedure, you should run through the recommendations mentioned in the log file and execute the scripts to fix any issues.
Note: Ensure you copy the preupgrd.sql and utluppkg.sql scripts from the 12c Oracle home/rdbms/admin directory to the current Oracle database/rdbms/admin location.
Parallel-upgrade utility
The database upgrade duration is directly proportional to the number of components that are configured on the database, rather than the database size. In previous releases, there was no direct option or workaround available to run the upgrade process in parallel to quickly complete the overall upgrade procedure.The catctl.pl (parallel-upgrade utility) that replaces the legacy catupgrd.sql script in 12c R1 comes with an option to run the upgrade procedure in parallel mode to improve the overall duration required to complete the procedure.
The following procedure explains how to initiate the parallel (with 3 processes) upgrade utility; you need to run this after you STARTUP the database in UPGRADE mode:
cd $ORACLE_12_HOME/perl/bin
$ ./perl catctl.pl –n 3 -catupgrd.sql
The above two steps need to be run explicitly when a database is upgraded manually. However, the DBUA inherits the both new changes.
Restore/Recover data files over the network
Yet another great enhancement in 12c R1. You can now restore or recover a data file, control file, spfile, tablespace or entire database between primary and standby databases using a SERVICE name. This is particularly useful to synchronize the primary and standby databases.When there is a pretty long gap found between the primary and standby database, you no longer require the complex roll-forward procedure to fill the gap between the primary and standby. RMAN is able to perform standby recovery getting the incremental backups through the network and applying them to the physical standby database. Having said that, you can directly copy the required data files from the standby location to the primary site using the SERVICE name e.g. in the case of a data file, tablespace lost on the primary database, or without actually restoring the data files from a backup set.
The following procedure demonstrates how to perform a roll forward using the new features to synchronize the standby database with its primary database:
On the physical standby database:
./rman target "username/password@standby_db_tns as SYSBACKUP"
RMAN> RECOVER DATABASE FROM SERVICE primary_db_tns USING COMPRESSED BACKUPSET;
The above example uses the primary_db_tns connect string defined on the standby database, connects to the primary database, performs an incremental backup, transfers these incremental backups over standby destination, and then applies these files to the standby database to synchronize the standby. However, you need to ensure you have configured primary_db_tns to point to the primary database on the standby database side.
In the following example, I will demonstrate a scenario to restore a lost data file on the primary database by fetching the data file from the standby database:
On the primary database:
./rman target "username/password@primary_db_tns as SYSBACKUP"RMAN> RESTORE DATAFILE ‘+DG_DISKGROUP/DBANME/DATAFILE/filename’ FROM SERVICE standby_db_tns;
Data Pump enhancements
This part of the section will focus on the important enhancements introduced in data pumps. There are quite a few useful additions, such as converting view into a table while exporting and turning off logging while import.Turn off redo log generation
The new TRANSFORM option introduced in data pumps import provides the flexibility to turn off the redo generation for the objects during the course of import. When DISABLE_ARCHIVE_LOGGING values is specified with the TRANSFORM option, redo generation for the objects in the context will be turned off during the entire import duration. This feature provides a great relief when importing large tables, and reduces the excessive redo generation, which results in quicker imports. This attribute applies to tables and indexes.This example demonstrates this feature:
$ ./impdp directory=dpump dumpfile=abcd.dmp logfile=abcd.log TRANSFORM=DISABLE_ARCHIVE_LOGGING:Y
Transport view as table
This is another improvement in the data pumps. With the new VIEWS_AS_TABLES option, you can unload the view data into a table. The following example describes how to unload views data into a table during export:$ ./expdp directory=dpump dumpfile=abcd.dmp logfile=abcd.log views_as_tables=my_view:my_table
Real-time ADDM analysis
Analyzing past and current database health statuses through a set of automatic diagnostic tools such as AWR, ASH and ADDM is part of every DBAs life. Though each individual tool can be used at various levels to measure the database’s overall heath and performance, no tool can be used when the database is unresponsive or totally hung.When you encounter an unresponsive database or hung state, and if you have configured Oracle Enterprise Manager 12c Cloud Control, you can diagnose serious performance issues. This would give you a good picture about what’s currently going on in the database, and might also provide a remedy to resolve the issue.
The following step-by-step procedure demonstrates how to analyze the situation on the Oracle EM 12c Cloud Control :
- Select the Emergency Monitoring option from the Performance menu on the Access the Database Home page.This will show the top blocking sessions in the Hang Analysis table.
- Select the Real-Time ADDM option from the Performance to perform Real-time ADDM analysis.
- After collecting the performance data, click on the Findings tab to get the interactive summary of all the findings.
Gathering statistics concurrently on multiple tables
In previous Oracle database editions, whenever you execute a DBMS_STATS procedure to gather table, index, schema or database level statistics, Oracle used to collect stats one table at a time. If the table is big enough, then increasing the parallelism was recommended. With 12c R1, you can now collect stats on multiple tables, partitions and sub partitions concurrently. Before you start using it, you must set the following at the database level to enable the feature:SQL> ALTER SYSTEM SET RESOURCE_MANAGER_PLAN='DEFAULT_MAIN';
SQL> ALTER SYSTEM SET JOB_QUEUE_PROCESSES=4;
SQL> EXEC DBMS_STATS.SET_GLOBAL_PREFS('CONCURRENT', 'ALL');
SQL> EXEC DBMS_STATS.GATHER_SCHEMA_STATS('SCOTT');
Online rename and relocation of an active data file
Unlike in the previous releases, a data file migration or renaming in Oracle database 12c R1 no longer requires a number of steps i.e. putting the tablespace in READ ONLY mode, followed by data file offline action. In 12c R1, a data file can be renamed or moved online simply using the ALTER DATABASE MOVE DATAFILE SQL statement. While the data file is being transferred, the end user can perform queries, DML and DDL tasks. Additionally, data files can be migrated between storages e.g. from non-ASM to ASM and vice versa.Rename a data file:
SQL> ALTER DATABASE MOVE DATAFILE '/u00/data/users01.dbf' TO '/u00/data/users_01.dbf';Migrate a data file from non-ASM to ASM:
SQL> ALTER DATABASE MOVE DATAFILE '/u00/data/users_01.dbf' TO '+DG_DATA';Migrate a data file from one ASM disk group to another:
SQL> ALTER DATABASE MOVE DATAFILE '+DG_DATA/DBNAME/DATAFILE/users_01.dbf ' TO '+DG_DATA_02';Overwrite the data file with the same name, if it exists at the new location:
SQL> ALTER DATABASE MOVE DATAFILE '/u00/data/users_01.dbf' TO '/u00/data_new/users_01.dbf' REUSE;Copy the file to a new location whilst retaining the old copy in the old location:
SQL> ALTER DATABASE MOVE DATAFILE '/u00/data/users_01.dbf' TO '/u00/data_new/users_01.dbf' KEEP;
You can monitor the progress while a data file being moved by querying the v$session_longops dynamic view. Additionally, you can also refer the alert.log of the database where Oracle writes the details about action being taken place.
Online migration of table partition or sub-partition
Migration of a table partition or sub-partition to a different tablespace no longer requires a complex procedure in Oracle 12c R1. In a similar way to how a heap (non-partition) table online migration was achieved in the previous releases, a table partition or sub-partition can be moved to a different tablespace online or offline. When an ONLINE clause is specified, all DML operations can be performed without any interruption on the partition|sub-partition which is involved in the procedure. In contrast, no DML operations are allowed if the partition|sub-partition is moved offline.Here are some working examples:
SQL> ALTER TABLE table_name MOVE PARTITION|SUBPARTITION partition_name TO tablespace tablespace_name;
SQL> ALTER TABLE table_name MOVE PARTITION|SUBPARTITION partition_name TO tablespace tablespace_name UPDATE INDEXES ONLINE;The first example is used to move a table partition|sub-partition to a new tablespace offline. The second example moves a table partition/sub-partitioning online maintaining any local/global indexes on the table. Additionally, no DML operation will get interrupted when ONLINE clause is mentioned.
Important notes:
- The UPDATE INDEXES clause will avoid any local/global indexes going unusable on the table.
- Table online migration restriction applies here too.
- There will be locking mechanism involved to complete the procedure, also it might leads to performance degradation and can generate huge redo, depending upon the size of the partition, sub-partition.
Invisible columns
In Oracle 11g R1, Oracle introduced a couple of good enhancements in the form of invisible indexes and virtual columns. Taking the legacy forward, invisible column concepts has been introduced in Oracle 12c R1. I still remember, in the previous releases, to hide important data –columns from being displayed in the generic queries– we used to create a view hiding the required information or apply some sort of security conditions.In 12c R1, you can now have an invisible column in a table. When a column is defined as invisible, the column won’t appear in generic queries, unless the column is explicitly referred to in the SQL statement or condition, or DESCRIBED in the table definition. It is pretty easy to add or modify a column to be invisible and vice versa:
SQL> CREATE TABLE emp (eno number(6), ename name varchar2(40), sal number(9) INVISIBLE);
SQL> ALTER TABLE emp MODIFY (sal visible);You must explicitly refer to the invisible column name with the INSERT statement to insert the database into invisible columns. A virtual column or partition column can be defined as invisible too. However, temporary tables, external tables and cluster tables won’t support invisible columns.
Multiple indexes on the same column
Pre Oracle 12c, you can’t create multiple indexes either on the same column or set of columns in any form. For example, if you have an index on column {a} or columns {a,b}, you can’t create another index on the same column or set of columns in the same order. In 12c, you can have multiple indexes on the same column or set of columns as long as the index type is different. However, only one type of index is usable/visible at a given time. In order to test the invisible indexes, you need to set the optimizer_use_use_invisible_indexes=true.Here’s an the example:
SQL> CREATE INDEX emp_ind1 ON EMP(ENO,ENAME);
SQL> CREATE BITMAP INDEX emp_ind2 ON EMP(ENO,ENAME) INVISIBLE;
DDL logging
There was no direction option available to log the DDL action in the previous releases. In 12cR1, you can now log the DDL action into xml and log files. This will be very useful to know when the drop or create command was executed and by who. The ENABLE_DDL_LOGGING initiation parameter must be configured in order to turn on this feature. The parameter can be set at the database or session levels. When this parameter is enabled, all DDL commands are logged in an xml and a log file under the $ORACLE_BASE/diag/rdbms/DBNAME/log|ddl location. An xml file contains information, such as DDL command, IP address, timestamp etc. This helps to identify when a user or table dropped or when a DDL statement is triggered.To enable DDL logging
SQL> ALTER SYSTEM|SESSION SET ENABLE_DDL_LOGGING=TRUE;The following DDL statements are likely to be recorded in the xml/log file:
- CREATE|ALTER|DROP|TRUNCATE TABLE
- DROP USER
- CREATE|ALTER|DROP PACKAGE|FUNCTION|VIEW|SYNONYM|SEQUENCE
Temporary Undo
Each Oracle database contains a set of system related tablespaces, such as, SYSTEM, SYSAUX, UNDO & TEMP, and each are used for different purposes within the Oracle database. Pre Oracle 12c R1, undo records generated by the temporary tables used to be stored in undo tablespace, much similar to a general/persistent table undo records. However, with the temporary undo feature in 12c R1, the temporary undo records can now be stored in a temporary table instead of stored in undo tablespace. The prime benefits of temporary undo includes: reduction in undo tablespace and less redo data generation as the information won’t be logged in redo logs. You have the flexibility to enable the temporary undo option either at session level or database level.Enabling temporary undo
To be able to use the new feature, the following needs to be set:- Compatibility parameter must be set to 12.0.0 or higher
- Enable TEMP_UNDO_ENABLED initialization parameter
- Since the temporary undo records now stored in a temp tablespace, you need to create the temporary tablespace with sufficient space
- For session level, you can use: ALTER SESSION SET TEMP_UNDO_ENABLE=TRUE;
Query temporary undo information
The dictionary views listed below are used to view/query the information/statistics about the temporary undo data:- V$TEMPUNDOSTAT
- DBA_HIST_UNDOSTAT
- V$UNDOSTAT
SQL> ALTER SYSTEM|SESSION SET TEMP_UNDO_ENABLED=FALSE;
Backup specific user privilege
In 11g R2, SYSASM privilege was introduced to perform ASM specific operations. Similarly, backup and recovery tasks specific privilege SYSBACKUP has been introduced in 12c to execute backup and recovery commands in Recovery Manager (RMAN). Therefore, you can create a local user in the database and grant the SYSBACKUP privilege to perform any backup and recovery related tasks in RMAN without being granting the SYSDBA privilege.$ ./rman target "username/password as SYSBACKUP"
How to execute SQL statement in RMAN
In 12c, you can now execute any SQL and PL/SQL commands in RMAN without the need of a SQL prefix: you can execute any SQL and PLS/SQL commands directly from RMAN. How you can execute SQL statements in RMAN:RMAN> SELECT username,machine FROM v$session; RMAN> ALTER TABLESPACE users ADD DATAFILE SIZE 121m;
Table or partition recovery in RMAN
Oracle database backups are mainly categorized into two types: logical and physical. Each backup type has its own pros and cons. In previous editions, it was not feasible to restore a table or partition using existing physical backups. In order to restore a particular object, you must have logical backup. With 12c R1, you can recover a particular table or partition to a point-in-time or SCN from RMAN backups in the event of a table drop or truncate.When a table or partition recovery is initiated via RMAN, the following action is performed:
- Required backup sets are identified to recover the table/partition
- An auxiliary database will be configured to a point-in-time temporarily in the process of recovering the table/partition
- Required table/partitions will be then exported to a dumpfile using the data pumps
- Optionally, you can import the table/partitions in the source database
- Rename option while recovery
 RMAN> connect target "username/password as SYSBACKUP";
 RMAN> RECOVER TABLE username.tablename UNTIL TIME 'TIMESTAMP…'
  AUXILIARY DESTINATION '/u01/tablerecovery'
  DATAPUMP DESTINATION '/u01/dpump'
  DUMP FILE 'tablename.dmp'
  NOTABLEIMPORT    -- this option avoids importing the table automatically.
REMAP TABLE 'username.tablename': 'username.new_table_name';    -- can rename table with this option.
Important notes:
- Ensure sufficient free space available under /u01 filesystem for auxiliary database and also to keep the data pump file
- A full database backup must be exists, or at least the SYSTEM related tablespaces
- SYS user table/partition can’t be recovered
- Tables/partitions stored under SYSAUX and SYSTEM tablespaces can’t be recovered
- Recovery of a table is not possible when REMAP option used to recovery a table that contains NOT NULL constraints
Restricting PGA size
Pre Oracle 12c R1, there was no option to limit and control the PGA size. Although, you set a certain size to PGA_AGGREGATE_TARGET initialization parameter, Oracle could increase/reduce the size of the PGA dynamically based on the workload and requirements. In 12c, you can set a hard limit on PGA by enabling the automatic PGA management, which requires PGA_AGGREGATE_LIMIT parameter settings. Therefore, you can now set the hard limit on PGA by setting the new parameter to avoid excessive PGA usage.SQL> ALTER SYSTEM SET PGA_AGGREGATE_LIMIT=2G; SQL> ALTER SYSTEM SET PGA_AGGREGATE_LIMIT=0; --disables the hard limit
Important notes:
When the current PGA limits exceeds, Oracle will automatically terminates/abort the session/process that holds the most untenable PGA memory.
Additions/Enhancements in Automatic Storage Management (ASM)
Flex ASM
In a typical Grid Infrastructure installation, each node will have its own ASM instance running and act the as the storage container for the databases running on the node. There is a single point-of-failure threat with this setup. For instance, if the ASM instance on the node suffers or fails all the databases and instances running on the node will be impacted. To avoid ASM instance single-point-failure, Oracle 12c provides a Flex ASM feature. The Flex ASM is a different concept and architecture all together. Only a fewer number of ASM Instances need to run on a group of servers in the cluster. When an ASM instance fails on a node, Oracle Clusterware automatically starts surviving (replacement) ASM instance on a different node to maintain availability. In addition, this setup also provides ASM instance load balancing capabilities for the instances running on the node. Another advantage of Flex ASM is that it can be configured on a separate node.When you choose Flex Cluster option as part of the cluster installation, Flex ASM configuration will be automatically selected as it is required by the Flex Cluster. You can also have traditional cluster over Flex ASM. When you decide to use Flex ASM, you must ensure the required networks are available. You can choose the Flex ASM storage option as part of Cluster installation, or use ASMCA to enable Flex ASM in a standard cluster environment.
The following command shows the current ASM mode:
$ ./asmcmd showclustermode
$ ./srvctl config asm
Or connect to the ASM instances and query the INSTANCE_TYPE parameter. If the output value is ASMPROX, then, the Flex ASM is configured.
Increased ASM storage limits
The ASM storage hard limits on maximum ASM disk groups and disk size has been drastically increased. In 12cR1, ASM support 511 ASM disk groups against 63 ASM disk groups in 11gR2. Also, an ASM disk can be now 32PB size against 20PB in 11gR2.Tuning ASM rebalance operations
The new EXPLAIN WORK FOR statement in 12c measures the amount of work required for a given ASM rebalance operation and inputs the result in V$ASM_ESTIMATE dynamic view. Using the dynamic view, you can adjust the POWER LIMIT clause to improve the rebalancing operation work. For example, if you want to measure the amount of work required for adding a new ASM disk, before actually running the manual rebalance operation, you can use the following:SQL> EXPLAIN WORK FOR ALTER DISKGROUP DG_DATA ADD DISK data_005; SQL> SELECT est_work FROM V$ASM_ESTIMATE; SQL> EXPLAIN WORK SET STATEMENT_ID='ADD_DISK' FOR ALTER DISKGROUP DG_DATA AD DISK data_005; SQL> SELECT est_work FROM V$ASM_ESTIMATE WHERE STATEMENT_ID = 'ADD_DISK’;You can adjust the POWER limit based on the output you get from the dynamic view to improve the rebalancing operations.
ASM Disk Scrubbing
The new ASM Disk Scrubbing operation on a ASM diskgroup with normal or high redundancy level, verifies the logical data corruption on all ASM disks of that ASM diskgroup, and repairs the logical corruption automatically, if detected, using the ASM mirror disks. The disk scrubbing can be performed at disk group, specified disk or on a file and the impact is very minimal. The following examples demonstrate the disk scrubbing scenario:SQL> ALTER DISKGROUP dg_data SCRUB POWER LOW:HIGH:AUTO:MAX; SQL> ALTER DISKGROUP dg_data SCRUB FILE '+DG_DATA/MYDB/DATAFILE/filename.xxxx.xxxx' REPAIR POWER AUTO;
Active Session History (ASH) for ASM
The V$ACTIVE_SESSION_HISOTRY dynamic view now provides the active session sampling on ASM instance too. However, the use of diagnostic pack is subject to the license.Additions/Enhancements in Grid Infrastructure
Flex Clusters
Oracle 12c support two types of cluster configuration at the time of Clusterware installation: Traditional Standard Cluster and Flex cluster. In a traditional standard cluster, all nodes in a cluster are tightly integrated to each other and interact through a private network and can access the storage directly. On the other hand, the Flex Cluster introduced two types of nodes arranged in Hub and Leaf nodes architecture. The nodes arranged in Hub nodes category are similar to the traditional standard cluster, i.e. they are interconnected to each other through a private network and have the directly storage read/write access. The Leaf nodes are different from the Hub nodes. They don’t need to have direct access to the underlying storage; rather they access the storage/data through Hub nodes.You can configure Hub nodes up to 64, and Leaf nodes can be many. In an Oracle Flex Cluster, you can have Hub nodes without having Leaf nodes configured, but no Leaf nodes exist without Hub nodes. You can configure multiple Leaf nodes to a single Hub node. In Oracle Flex Cluster, only Hub nodes will have direct access to the OCR/Voting disks. When you plan large scale Cluster environments, this would be a great feature to use. This sort of setup greatly reduces interconnect traffic, provides room to scale up the cluster to the traditional standard cluster.
There are two ways to deploy the Flex Cluster:
- While configuring a brand new cluster
- Upgrade a standard cluster mode to Flex Cluster
The following steps are required to convert a standard cluster mode to Flex Cluster mode:
1. Get the current status of the cluster using the following command:
$ ./crsctl get cluster mode status2. Run the following command as the root user:
$ ./crsctl set cluster mode flex
$ ./crsctl stop crs
$ ./crsctl start crs –wait
3. Change the node role as per your design
$ ./crsctl get node role config
$ ./crsctl set node role hub|leaf
$ ./crsctl stop crs
$ ./crsctl start crs -wait
Note the following:
- You can’t revert back from Flex to Standard cluster mode
- Cluster node mode change requires cluster stack stop/start
- Ensure GNS is configured with a fixed VIP
OCR backup in ASM disk group
With 12c, OCR can be now be backed-up in ASM disk group. This simplifies the access to the OCR backup files across all nodes. In case of OCR restore, you don’t need to worry about which node the OCR latest backup is on. One can simply identify the latest backup stored in the ASM from any node and can perform the restore easily.The following example demonstrates how to set the ASM disk group as OCR backup location:
$ ./ocrconfig -backuploc +DG_OCR
IPv6 support
With Oracle 12c, Oracle now supports IPv4 and IPv6 network protocol configuration on the same network. You can now configure public network (Public/VIP) either on IPv4, IPv6 or combination protocol configuration. However, ensure you use the same set of IP protocol configuration across all nodes in a cluster.Additions/Enhancements in RAC (database)
What-If command evaluation
Using the new What-if command evaluation (-eval) option with srvctl, one can now determine the impact of running the command. This new addition to the srvctl command, will let you simulate the command without it actually being executed or making any changes to the current system. This is particularly useful in a situation when you want to make a change to an existing system and you’re not sure of the outcome. Therefore, the command will provide the effect of making the change. The –eval option also can be used with crsctl command.For example, if you want to know what will happen if you stop a particular database, you can use the following example:
$ ./srvctl stop database –d MYDB –eval
$ ./crsctl eval modify resource <resource_name> -attr “value”
Miscellaneous srvctl improvements
There are a few new additions to the srvctl command. The following demonstrates the new addition to stop/start database/instance resources on the cluster:srvctl start database|instance –startoption NOMOUNT|MOUNT|OPEN srvctl stop database|instance –stopoption NOMOUNT|MOUNT|OPENThe next article will focus on top most developers’ features on 12c.
****************************************************************************************************
Oracle Database 12c (12.1.0.1.0) installation on OEL6.
Linux server meets the minimum hardware requirements.
- 1GB of RAM (plus appropriately sized swap space)
- 6.4GB of disk space for the software installation
- 1GB of disk space for your /tmp directory
Package and OS requirements
In this example, I’m meeting the package and Operating System requirements by running the following yum command (as root):yum install oracle-rdbms-server-12cR1-preinstall
[root@sujeet newrpms]# ls


binutils-2.17.50.0.6-6.0.1.el5.i386.rpm

binutils-2.17.50.0.6-9.0.1.el5.i386.rpm

compat-binutils215-2.15.92.0.2-24.i386.rpm

compat-libcwait-2.0-2.i386.rpm

compat-libstdc++-3.2-1.i386.rpm

compat-libstdc++-egcs-1.1.2-1.i386.rpm

compat-oracle-el5-1.0-5.i386.rpm

fonts-chinese-3.02-12.el5.noarch.rpm

openmotif21-2.1.30-11.EL5.i386.rpm

openmotif21-debuginfo-2.1.30-11.EL5.i386.rpm

xorg-x11-libs-compat-6.8.2-1.EL.33.0.1.i386.rpm


INSTALL RPM COMMAND:-
[root@sujeet ~]#  rpm –ivh  <rpmname>

[root@sujeet ~]#  rpm –Uivh <rpmname>

Install rpm check:-
[root@sujeet ~]#  rpm -qa |grep <rpmname>
(The “oracle-rdbms-server-11gR2-preinstall” RPM seems to work fine too though…)If you don’t install the package bundle above, then you’ll have to meet all of the required prerequisites manually.
CHANGE HOSTNAME OR MACHINE NAME
[root@sujeet ~]# vi /etc/hosts
Make sure that there is an entry in /etc/hosts file for your
machine like this:
127.0.0.1       localhost.localdomain  localhost
100.200.23.25   oracle.sujeet           oracle
GUI:-Create User and Group
System -> Administration -> Users and Groups ->
i) Add user oracle
ii) Add Group dba
iii) Assign user to that group
OR
COMMAND LINE:-
[root@sujeet ~]# useradd -g dba -m oracle
[root@sujeet ~]# passwd oracle
Changing password for user oracle.
New UNIX password:
BAD PASSWORD: it is based on a dictionary word
Retype new UNIX password:
passwd: all authentication tokens updated successfully.
Create directories where the Oracle Software and database
will be installed.

[root@sujeet ~]#  Mkdir /u01
[root@sujeet ~]#  chown -R oracle:dba  /u01
[root@sujeet ~]#  chmod -R 777 /u01


SELINUX=disabled

System -> Administration ->

If you leave SELINUX=enforcing then you may get an error later
while starting sqlplus:
sqlplus: error while loading shared libraries:
/usr/lib/oracle/default/client64/lib/libclntsh.so.11.1:
cannot restore segment
prot after reloc: Permission denied


 Linux Kernel Parameters to support Oracle.

Open /etc/sysctl.conf and add the following lines:

[root@sujeet ~]# vi /etc/sysconfig/network

# Oracle settings
fs.file-max = 65536
kernel.shmall = 2097152
kernel.shmmax = 2147483648
kernel.shmmni = 4096
kernel.sem = 250 32000 100 128
net.ipv4.ip_local_port_range = 1024 65500
net.core.rmem_default = 262144
net.core.rmem_max = 262144
net.core.wmem_default = 262144
net.core.wmem_max = 262144

Make the kernel parameters changes effective immediately:

[root@sujeet ~]# /sbin/sysctl -p

[root@sujeet ~]#  /sbin/sysctl -a | grep <name of kernel>
Download the database 12c software
You need to download both Oracle Database 12c parts from the Oracle Technology Network (OTN).Use Below Link:-
http://www.oracle.com/technetwork/database/enterprise-edition/downloads/index.html
Oracle Database Software Downloads
(12.1.0.1.0)
| File 1, File 2 (2.5 GB) See All | |
| File 1, File 2 (2.3 GB) See All | |
| File 1, File 2 (2.6 GB) See All | |
| File 1, File 2 (2.3 GB) See All |
Once you’ve downloaded the software, unzip both files to a staging area:
unzip /tmp/linuxamd64_12c_database_1of2.zip -d /u02/app/oracle/software
unzip /tmp/linuxamd64_12c_database_2of2.zip -d /u02/app/oracle/software
All of the contents from the above will be extracted to a “database” directory.
Restart system
[root@sujeet ~]# init 6
Permission to connect any HOST
[root@sujeet ~]# xhost +
access control disabled, clients can connect from any host
Start the installer
Open an X-Windows session to the server as the ‘oracle’ user.Once you’ve met the requirements, and have unzipped the software, you can start the install:
/u02/app/oracle/software/database/runInstaller
Once the GUI starts, respond as follows:- Configure Security Updates
- Unchecked ‘I wish to receive security updates via My Oracle Support’
- Next
- Confirm with ‘Yes’

- Download Software Updates
- Skip software updates
- Next

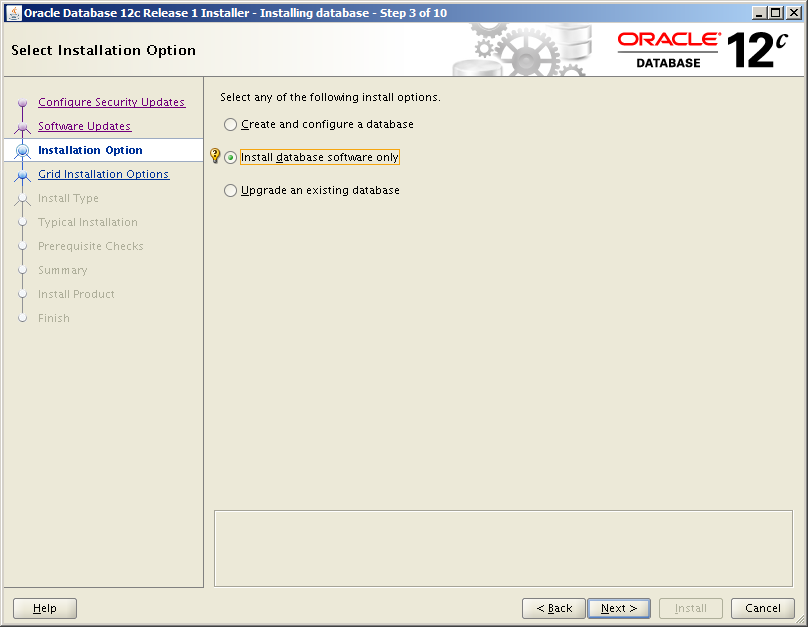
- Installation Option
- Install database software only (you can opt to create a database instance at the same time, but I’m keeping the two separate here)
- Next
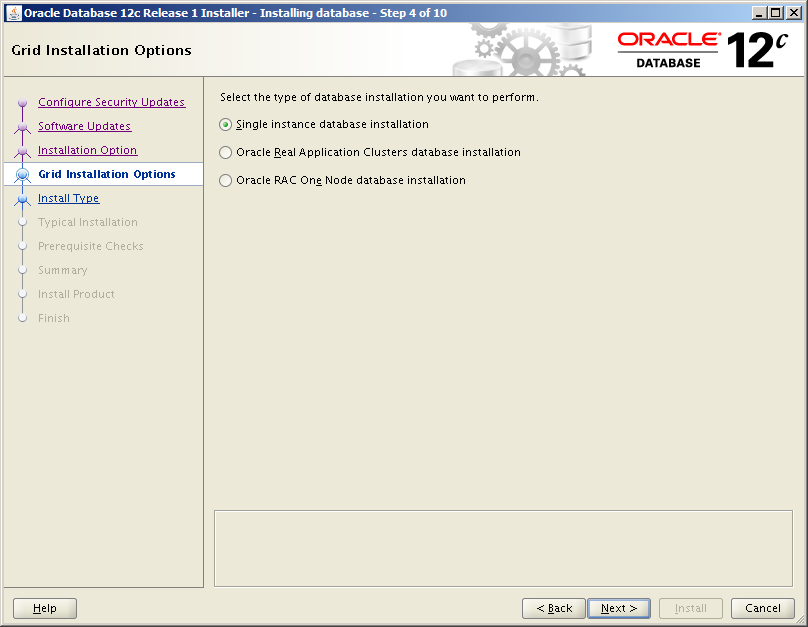
- Grid Installation Options
- Single instance database installation
- Next
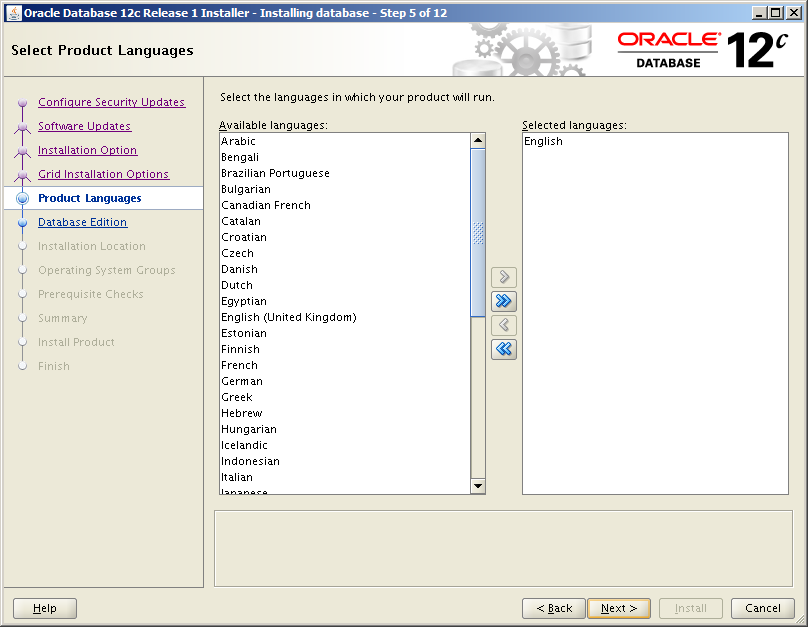
- Product Languages
- Select any additional required languages and move across, otherwise leave just the default ‘English’ selected
- Next
- Database Edition
- Enterprise Edition (6.4GB) (…or as appropriate depending on which edition you’re licensed for!)
- Next

- Installation Location
- Oracle Base: /u01/app/oracle
- Software Location: /u01/app/oracle/product/12.1.0.1
- Next

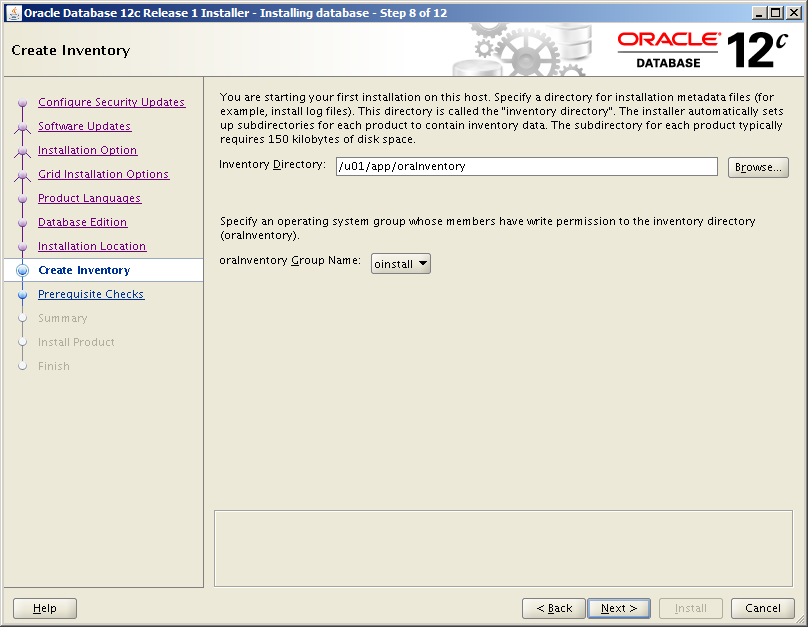
- Create Inventory (first Oracle installation only)
- Inventory Directory: /u01/app/oraInventory
- oraInventory Group Name: oinstall
- Next
- Operating System Groups
- Database Administrator (OSDBA) group: dba
- Database Operator (OSOPER) group (Optional): dba
- Leave all the other memberships as the default ‘dba’ group too.
- Next

- Prerequisites Checks
- All prerequisite checks should complete successfully here, if not, then obviously they will need addressing before proceeding. Assuming all database validation checks are successful, you shouldn’t actually see this page as the installer will automatically move onto the next screen.

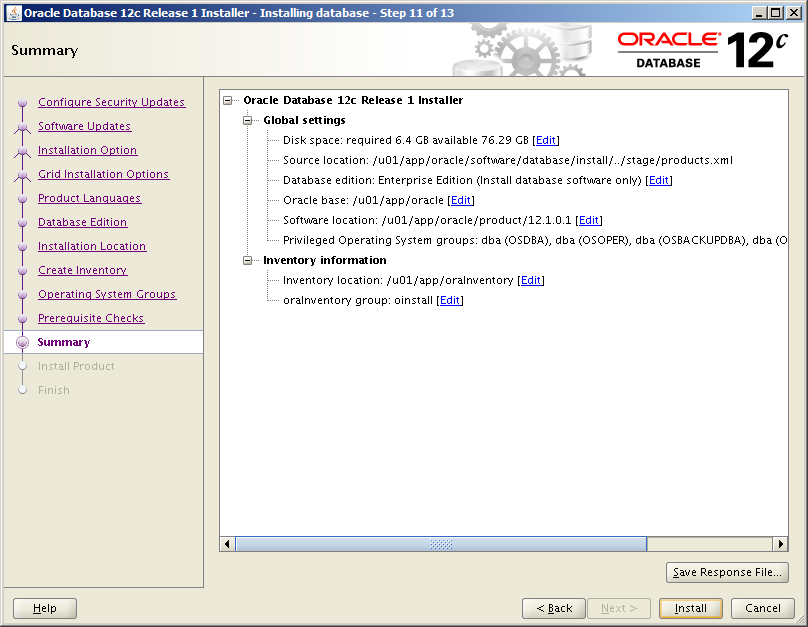
- Summary
- Check everything is correct!
- Click Install


Run the root.sh scripts
When prompted, run the following as root:/u01/app/oraInventory/orainstRoot.sh (first Oracle installations only)
[root@linux06 ~]# /u01/app/oraInventory/orainstRoot.sh
 Changing permissions of /u01/app/oraInventory.
Adding read,write permissions for group.
Removing read,write,execute permissions for world.
/u01/app/oracle/product/12.1.0.1/root.sh
[root@linux06 ~]# /u01/app/oracle/product/12.1.0.1/root.sh
 Performing root user operation for Oracle 12c

The following environment variables are set as:
    ORACLE_OWNER= oracle
    ORACLE_HOME= /u01/app/oracle/product/12.1.0.1

Enter the full pathname of the local bin directory: [/usr/local/bin]: <enter>
   Copying dbhome to /usr/local/bin ...
   Copying oraenv to /usr/local/bin ...
   Copying coraenv to /usr/local/bin ...

Creating /etc/oratab file...
Entries will be added to the /etc/oratab file as needed by
Database Configuration Assistant when a database is created
Finished running generic part of root script.
Now product-specific root actions will be performed.
Finally, click close to finish
Environment settings
Once the installation has finished, add the following variables to your ‘oracle’ user profile:vi /home/oracle/.bash_profile # Oracle variables TMP=/tmp; export TMP TMPDIR=$TMP; export TMPDIR ORACLE_HOSTNAME=linux06.vbox; export ORACLE_HOSTNAME ORACLE_BASE=/u01/app/oracle; export ORACLE_BASE ORACLE_HOME=$ORACLE_BASE/product/12.1.0.1; export ORACLE_HOME #ORACLE_SID=SNAP12C; export ORACLE_SID #PATH=/usr/sbin:$PATH; export PATH PATH=$ORACLE_HOME/bin:$PATH; export PATH LD_LIBRARY_PATH=$ORACLE_HOME/lib:/lib:/usr/lib; export LD_LIBRARY_PATH CLASSPATH=$ORACLE_HOME/jlib:$ORACLE_HOME/rdbms/jlib; export CLASSPATHReload your profile with the new variables:
. ~/.bash_profile
How to Deinstall 12c
If you ever want to remove the software, simply run start the deinstall utility as follows, responding appropriately:
$ORACLE_HOME/deinstall/deinstall
********************END**************************
Oracle 12c Database New Features
RMAN - Recovery manager
• Restoring a datafile
– May require tapes+heads to be available
– May be slow
• 12c
– Recover from physical standby database
• Transfer files from physical sby to primary
• Advantages:
– Easier and faster restore
– Less dependent from backup infrastructure
Recovery manager
• Accidental ‘drop table’, ‘truncate table’, wrong
script, human error, ...
• Pre 12c
– Import from older export file (if available)
– Restore older backup to extract table (+++work)
– Flashback physical standby (+work)
– ...
• 12c: Table recovery
– Restore + recover individual tables from rman
backup
– To any point in time
– Fast and easy
• Further RMAN improvements
– Automate the use of incremental backup to bring
a standby back in sync
• Now a complex and manual procedure
– Auto conversion for cross-platform backup/restore
• Cfr “convert database” statement
• Rman 12c
– Makes a lot of tasks easier
Application continuity
• Traditional RAC failover
– TAF: queries are transparent, ins/upd/del not
– FCF: no tcpip timeouts
• Any sql gets “connection closed” and needs to
handle this (incl. select)
• 12c: “Real Transparent Fail over Mechanism”
– For queries and transactions
– Currently only for java connection pool or plain jdbc
– 100% transparent fail over
Data Guard - Global data services
• Failover: standby db becomes primary
– Clients have to be redirected
– No ‘out of the box’ solution until now
• Dns change, on role-change trigger, ldap,
tnsnames.ora, ...
• 12c: global data services
– Purpose: no client reconfiguration in case of
failover or switchover
– + other advantages
Global data services
• Features
– Awareness which site is primary
• Can connect clients always
to primary site
– Rule based
• Can direct applications to active data guard
• If active DG 1 not available go to other active DG or
primary
– Affinity
• Prefer local databases
• Any replication technology
– “Global load balancing and fail over for replicated
databases”

Data Guard – Far sync standby
• Far sync standby
– Instance with only standby and archive logs
– Acts as a ‘dispatcher’ for multiple standby’s
• Reduced WAN traffic
• Easier failover
– “validate database” before switchover

Grid Infrastructure
• Pre 12c, every node has
– Cluster software
– ASM software
– One or more database instances
– Optionally ACFS (ASM cluster file system)
– Optionally applications running
• New concepts
– Flex Cluster
– Flex ASM

• Flex cluster
– Group database + application
servers in one cluster
– However, application servers
• Do not need ASM instance
• Longer timeoutsSolution
• Light-weight stack
– No inter-node traffic
– Local storage or NFS
– Cloud!
• Integrated cluster solution

Flex ASM
– 5 node-cluster
– Less than 5 nodes run ASM instance
• Database requests file mapping from remote
ASM

ILM
• Scope
– Historical data – archiving - compression
– Applications usually work on recent data
– Older data may take a lot of place
• Solution pre 12c
– Move data to other tablespaces on other disks
– Change compression level
– Set tablespaces read only
– Manually, scripts, 3rd party tools, ...
ILM – Oracle 12c
• “In-database archive”
– Archive infrequently used data within the database
• By marking data as archived
• Making rows ‘invisible’
– Query can choose to (not) see archived data
• Advanced data optimization
– Automatically move data based on policies
• Other tablespace, read only, compression level
– Online
–
alter table ... compress for query after 3 months of no modification
• Advanced compression
– Faster and smaller
– In-memory scan
• Data not expanded in memory during scan
• Up to 3x faster for low cardinality data
• Heat maps
– Track access (read and write) to tables/partitions/
rows
– Information used for ILM
SQL Enhancements
• Duplicate indexes
– “ORA-01408: such column list already indexed”
– Can have both B-tree and bitmap index on same
column(s)
• WITH-plsql function
– 4-8x faster execution
WITH
function is_number(n varchar2)
return char is
begin
<check if n is a number>
end
select * from <table>
where is_number(sal) = ‘NO’;
Varchar2(32K)
– Currently max is 4000 bytes
• Auto-populate column from a sequence
– Using the DEFAULT clause for a column
• In-memory global temporary tables
– Useful during reports
– 12c: purely in memory
• No IO for redo and undo
• Can be used on Active Data Guard db
• In-memory LOB queries and updates
– Speed up LOB operations
• Concatenate, substring, length ,instr, ...
Other useful enhancements
• Data pump
– Impdp can be done in NOLOGGING
• Must faster imports
• Move datafiles online
– While read and write activity are going on
– Allows easy migration to other storage
• SQL*Net
– Larger buffers, data compression
Performance
• Very often caused by bad execution plans
– Usually due to bad statistics
• Old or missing statistics
• Hard to predict number of returned rows
– Complex predicates
• where substr(to_char(edate,’YYMMDD’),2,2) > 8
– Join cardinalities
– Data skew, correlation
• Solutions
– Adaptive cursor sharing (11g)
– Adaptive statistics (12c)
– Adaptive execution plans (12c)
12c: Adaptive statistics
– Actual number of rows <> estimates
– Statistics marked as ‘incorrect’ / ‘unreliable’
– Next query will do ‘dynamic sampling’
• Results in much better estimates
• Better execution plans
Adaptive execution plans
– E.g. 2 options in execution plan
• Join using nested loops
– Best when few rows need to be joined
• Join using hash join
– Best when a lot of rows need to be joined
– “Inflection point”
• Rows are buffered during execution of query
• Inflection point reached or not?: take plan 1 or 2
– Result: “deferred execution plan”
EM Express
• Replaces Oracle 11g Db-Console
• Embedded in 12c database
• Pr-configured & installed with the database
• Uses less disk space and memory
– +/- 20Mb footprint
• Subset of OEM12c features
– Similar interface

– Proactive problem detection and analysis
• Lightweight check runs every 3 sec
• On detection of bad performance, analysis is
triggered
– High cpu, io spikes, memory, hangs, ...
• Collects rich set of data for analysis
• Stores reports in AWR (persistent - purged)
– Can be triggered manually
Monitor composite operations
– ‘label’ a unit of work
• E.g. SQL*Plus script, batch job, dpump job, ...
– View top SQL and performance metrics
• “Database Performance Hub”
– Single view of all performance related info
• ADDM, Top SQL, ASH analytics, ...
• Switch easily between sql monitoring, ash,
addm, ...
OEM 12c
• Database Instant Cloning
– Using copy-on-write
• Initial clone takes no space
• Only modified blocks take space
– Functional testing with minimal space
consumption
• Integrated subsetting and masking
– One-step masking + subsetting as data leaves the
source db
– Using copy-on-write
• Initial clone takes no space
• Only modified blocks take space
– Functional testing with minimal space
consumption
• Integrated subsetting and masking
– One-step masking + subsetting as data leaves the
source db

Pluggable databases
• Cloud -> shared infrastructure -> multi-tenancy• One application for multiple customers
• Customers may not see each others data
– Solution?
• Add extra column + where condition (+++work)
• Create multiple databases
– High resource usage
• Memory (1 SGA per database)
• Processes (a lot per database)
Solution 12c
– One ‘container database’
• Background processes
• Memory allocation
– Multiple ‘pluggable databases’
• The union of
– Tables, views, procedures, ... all application objects
– User definitions
– Privileges
• Can be plugged in a container database
• Can easily be moved to another container database
Pluggable databases
• Resource usage
– 6x less H/W resource, 5x more scalable
Use cases
– Consolidation
• Typical 11.2 database has +/- 30
background processes
• x15 database = 450 processes
– + user processes
– “Application as a Service”
• Multiple customers for same appl
• Each a separate PDB
Advantages
– Less resources
– Security
– Role separation
• Administrator of PDB can <> administrator of
CDB
– Less applications in one database
– Faster upgrades
• Unplug from 12.1, plug into 12.2

Conclusion
• 12c features– Data Guard
• Get more from Active Data Guard
• Making Data Guard easier and better
– RMAN
• Making backup and recovery easier and better
– Table recovery, cross platform, incr bup for
standby, ...
– Performance
• Making the database faster
– Optimizer, SQL, ...
Awareness
– Management of large volumes of data
• Compression
• ILM
• Automation
– Management of the environment
• OEM 12c
– Get more out of your Diagnostic and Tuning
Pack
• More than just the database
• Lifecycle management
• Architecture
– Grid infrastructure
• Larger RAC clusters
– Cloud infrastructure
• Provisioning and management of database
resources
• Private cloud
– Pluggable databases
• Change database management
• Very likely to become a ‘natural thing’

No comments:
Post a Comment