Oracle Application in DMZ (Demilitarized Zone)

DMZs For Civilians

In the IT industry, a demilitarized zone is a single or multi-segment perimeter network that demarks the portion of the corporate network that lies between the intranet and outside networks.  Corporate DMZ borders are enforced by firewalls and other dedicated networking devices.  


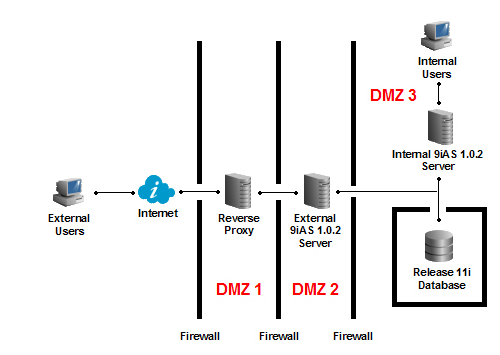
DMZs for the E-Business Suite

AutoConfig supports the use of DMZs with the E-Business Suite Release 11i, and an increasing number of our customers have either already implemented them or are planning to do so.  This is a common configuration:


In the configuration above, there are two different E-Business Suite application servers, each with its own unique domain name and setup.  External users access the E-Business Suite via the external "acme.company.com" address, and internal users access it via the "staff.acme.com" address.

Different Responsibilities for Internal and External Servers

It's possible (and recommended) to restrict the general set of Applications Responsibilities based on the application server that you're using.  

For example, there should be no reason to allow external users to modify your company's Chart of Accounts, so that responsibility can't be used if the end-user is logging in from outside the corporate intranet.

Possible Weak Points

There are two possible weaknesses with the first configuration shown above:
  1. If your external firewall is compromised, your external application server is also compromised, exposing an attack on your E-Business Suite database.
  2. There's nothing to prevent your internal users from attacking your internal application server, also exposing an attack on your E-Business Suite database.
Reverse Proxies and DMZs

If you're concerned about your external firewall being hacked, one possible countermeasure is to use layered DMZs and put a reverse proxy in the first DMZ.  


The reverse proxy has restricted capabilities and and the authority only to speak with the external application server.  It's possible to use the following as reverse proxies with the E-Business Suite:
  • Oracle Web Cache
  • Oracle HTTP Server
  • Other third-party reverse proxy servers, including Apache and Microsoft Proxy Server
An Inside Job

I'm a big fan of heist and con artist movies.  According to Hollywood, you can't pull off a big job without someone on the inside.  

It seems a lot of IT security analysts are fans, too, since they regularly publish surveys that suggest that the majority of security breaches are the result of employees with their hand in the till.  If we're to learn anything from movies, it's this:  trust nobody, not even your internal end-users.

That's why the second configuration above shows the E-Business Suite database server protected by its own firewall.  Even if your internal application server is compromised by an industrious but disgruntled fellow employee, your database is still protected.

Scratching the Surface

There are a number of other interesting DMZ-related architectural options for the E-Business Suite.  If you'd like to get more details, the following document is recommended reading:


Vendor API - Error creating contact - Contact information you are trying to import is already associated (Doc ID 1616295.1)


APPLIES TO:

Oracle Payables - Version 12.1.3 and later
Information in this document applies to any platform.
SYMPTOMS

On : 12.1.3 version, Supplier SupReports Merge Emp

When attempting to create a new vendor contact via the API
the following error occurs.

ERROR
-----------------------

-> User receiving error 'ERROR : Contact information you are
-> trying to import is already associated'


STEPS
-----------------------
The issue can be reproduced at will with the following steps:
import vendor contact details

BUSINESS IMPACT
-----------------------
The issue has the following business impact:
Due to this issue, users cannot import such data


CAUSE

BUg 17619121


SOLUTION

apply Patch 17619121

ORA-28000: the account is locked

Unlock User and set FAILED_LOGIN_ATTEMPTS to unlimited.


View Profile Assigned to a User:

SQL> SELECT PROFILE FROM DBA_USERS
WHERE USERNAME='SCOTT';

  PROFILE
 ----------
  DEFAULT

View Limits Set for the Profile:

SQL> SELECT RESOURCE_NAME, LIMIT FROM DBA_PROFILES
WHERE PROFILE='DEFAULT';

 RESOURCE_NAME  LIMIT   
------------------------    -------------       
COMPOSITE_LIMIT                UNLIMITED       
SESSIONS_PER_USER              UNLIMITED       
CPU_PER_SESSION               UNLIMITED       
CPU_PER_CALL                   UNLIMITED       
LOGICAL_READS_PER_SESSION     UNLIMITED       
LOGICAL_READS_PER_CALL        UNLIMITED       
IDLE_TIME                      UNLIMITED       
CONNECT_TIME                   UNLIMITED       
PRIVATE_SGA                    UNLIMITED       
FAILED_LOGIN_ATTEMPTS         10       
PASSWORD_LIFE_TIME            UNLIMITED       
PASSWORD_REUSE_TIME            UNLIMITED       
PASSWORD_REUSE_MAX            UNLIMITED       
PASSWORD_VERIFY_  FUNCTION     NULL       
PASSWORD_LOCK_TIME             UNLIMITED       
PASSWORD_GRACE_TIME            UNLIMITED       
16 rows selected.

Alter FAILED_LOGIN_ATTEMPTS Parameter:

From the user's profile we can see that the FAILED_LOGIN_ATTEMPTS parameter is set to a value of 10. Now we run below command to make it UNLIMITED.

SQL> ALTER PROFILE DEFAULT LIMIT FAILED_LOGIN_ATTEMPTS UNLIMITED;
Profile altered.

Unlock the Account:

Finally we will unlock the account by running below command.

SQL> ALTER USER SCOTT ACCOUNT UNLOCK;

RMAN-05520

Versions 10.2, 11.1, 11.2, 12.1

Error:  RMAN-05520 database name mismatch, auxiliary instance has %s, command specified 
%s 
---------------------------------------------------------------------------
Cause:-
 The database name specified in the initialization parameter was not the same as the database name provided in the DUPLICATE command.


Solution:-

Correct the database name in the command or adjust the database name of the auxiliary instance.


OR

Rman leaves modified auxiliary spfile parameters if DUPLICATE fails (Doc ID 1283344.1) To BottomTo Bottom

This document is being delivered to you via Oracle Support's Rapid Visibility (RaV) process and therefore has not been subject to an independent technical review.

APPLIES TO:

Oracle Database - Enterprise Edition - Version 11.2.0.1 to 11.2.0.1 [Release 11.2]
Information in this document applies to any platform.

SYMPTOMS:-

RMAN duplicate leaves behind an spfile for the auxiliary database if the duplicate fails with db_name set to the target db_name.
This causes subsequent rerun of the duplicate after fixing the failure to fail with:

RMAN-00571: ===========================================================
RMAN-00569: =============== ERROR MESSAGE STACK FOLLOWS ===============
RMAN-00571: ===========================================================
RMAN-03002: failure of Duplicate Db command at 07/26/2010 13:22:29
RMAN-05520: database name mismatch, auxiliary instance has <target db_name>, command specified <auxilliary db_name>

CAUSE:-

Bug 9302045:  RMAN DUPLICATE W/O CONNECTION TO TARGET CREATES SPFILE WITH DB_NAME OF TARGET.

This is a duplicate of unpublished bug 9393650: IF AUXILIARY STARTED WITH SPFILE AND DUPLICATE FAILS SPFILE HAS BAD PARAMETERS

SOLUTION:-

Manually amend the auxiliary spfile prior to rerunning duplicate or request a backport of unpublished bug 9393650 to 11.2.0.1 for your platform.

Unpublished bug 9393650 is fixed in 11.2.0.2 Patch Set Release.

REFERENCES

BUG:9302045 - RMAN DUPLICATE W/O CONNECTION TO TARGET CREATES SPFILE WITH DB_NAME OF TARGET

The XML Publisher Concurrent Request Fails Due to the Output Post Processing

Three possible errors can occur as below:
  • The Output Post Processor is not running or does not pick up the request

+————- 1) PUBLISH ————-+
Unable to find an Output Post Processor service to post-process request [request_id].
Check that the Output Post Processor service is running.
+————————————–+
Solutions:

* Verify that the Output Post Processor is enabled and active.
* If confirmed, retrieve the OPP log file either via the Forms application or via the Oracle Application Manager.
– Via the Forms application:
  1. Login to the application as SYSADMIN
  2. Responsibility: System Administrator
  3. Function: Concurrent –> Manager –> Administration
  4. Select the Output Post Processor
  5. Click on the Processes button
  6. Select the Concurrent Process which was active during the time that the request ran
  7. Click on the Manager Log button to open the Output Post Processor log file
– Via the Oracle Application Manager
  1. Login to the application as SYSADMIN
  2. Responsibility: System Administration
  3. Function: Oracle Applications Manager –> Concurrent Managers
  4. Select the Output Post Processor Service and click on View Details
  5. Click on View Processes
  6. Select the Concurrent Process which was active during the time that the request ran
  7. Click on the Log button to open the Output Post Processor log file
  • The Output Post Processor is running but has not picked up the request
...
+------------- 1) PUBLISH -------------+
The Output Post-processor is running but has not picked up
this request.No further attempts will be made to post-process
this request, and the request will be marked with Warning status.
Setting the profile option Concurrent: OPP Response Timeout
to a higher value may be necessary.
+--------------------------------------+
...
By default a timeout will occur if it takes longer then 120 seconds (2 min.) for the Output Post Processor to pick up the request from the Concurrent Manager process. In that case, the Concurrent Request will complete with status Warning and the Request log file will contain error message like above.
Solutions:

* Increase the value (in seconds) for the profile option ‘Concurrent:OPP Response Timeout‘.
  • The concurrent manager has timed out waiting for the Output Post-processor to finish this request

+————- 1) PUBLISH ————-+
The concurrent manager has timed out waiting for the Output Post-processor
to finish this request.
Check that there are enough Output Post-processor service processes running.
More information may be found in the service process logfile.
+————————————–+
The concurrent manager process has successfully invoked the OPP but it a timeout is encountered as the OPP takes too long to complete the job.
The time that this takes will depends on various elements such as:
  • size of the XML Data File
  • complexity of the template
  • performance of the server
  • ….
By default a timeout will occur if it takes longer then 300 seconds (5 min.) for the XML Publisher engine to generate the output file. The Concurrent Request will complete with status Warning and the Request log file will contain error message like above.
Solutions:
Increase the value (in seconds) for the profile option ‘Concurrent:OPP Process Timeout‘.

  • Output Post Processor (OPP) Log Contains Error “java.lang.OutOfMemoryError: Java heap space”

  • java.lang.reflect.InvocationTargetException Caused by:java.lang.OutOfMemoryError: Java heap space atoracle.xdo.parser.v2.XMLDocument.createNodeFromType(XMLDocument.java:2869) atoracle.xdo.parser.v2.XMLDocument.createNodeFromType(XMLDocument.java:3000)
Solutions:

1. Determine what the heap size per OPP process is currently:
  • select DEVELOPER_PARAMETERS from FND_CP_SERVICES
    where SERVICE_ID = (select MANAGER_TYPE from FND_CONCURRENT_QUEUES
    where CONCURRENT_QUEUE_NAME = ‘FNDCPOPP’);
2. The default should be:
  • J:oracle.apps.fnd.cp.gsf.GSMServiceController:-mx512m
3. Increase the Heap Space per Process to 1024:
  • update FND_CP_SERVICES
    set DEVELOPER_PARAMETERS = ‘J:oracle.apps.fnd.cp.gsf.GSMServiceController:-mx1024m
    where SERVICE_ID = (select MANAGER_TYPE from FND_CONCURRENT_QUEUES
    where CONCURRENT_QUEUE_NAME = ‘FNDCPOPP’);
4. Bring the managers down.
5. Run cmclean.sql script from Note 134007.1 – CMCLEAN.SQL Non-Destructive Script to Clean Concurrent Manager Tables.
6. Bring the managers up again.
OR
1. Log into applications with the System Administrator responsibility.
2. Navigate to Concurrent -> Program -> Define
3. Query the XML Publisher Template Re-Generator program
4. Set the following value for the Executable Options : -Xmx1024m
5. Save changes.
6. Retest the program.
OR
Configure the XML Publisher Administrator Configuration settings.
1. As XML Publisher Administrator navigate to Administration->Configuration.
2. Under Temporary Directory pick a temporary file location on your concurrent processing node. This should be at least 5GB or 20x larger than largest XML data file you generate
3.  Under FO Processing, set:
o Use XML Publisher’s XSLT processor set to True
o Enable scalable feature of XSLT processor set to False
o Enable XSLT runtime optimization set to True

Not printing the output of this request because post-processing failed.

While seeing the request log got the following information

Post-processing of request 50834534 failed at 17-JUL-2012 16:43:23 with the error message:
The concurrent manager has timed out waiting for the Output Post-processor to finish this request.

Check that there are enough Output Post-processor service processes running.
More information may be found in the service process logfile.
+--------------------------------------+

+------------- 2) PRINT   -------------+
Not printing the output of this request because post-processing failed.
+--------------------------------------+

Solution:-
Increase the profile option “Concurrent:OPP Process Timeout”..

 Check User level profile setting if its blank the paricular user will use site level profile setting

OR

while checking the OPP manager log 
i picked the following  error 

Caused by: oracle.xdo.parser.v2.XPathException: Cannot convert 417,8955 to number

i think this is data issue....

Probably a data conversion error

ORA-28002

ORA-28002: the password will expire within 5 days.

Cause: The user's account is about to about to expire and the password needs 
to be changed.
Action: Change the password or contact the database administrator.

Solutions:

1) Simply change the password to avoid it temporary.
 [oracle@sujeet ~]$ sqlplus / as sysdba

SQL> conn system/password

ERROR:
ORA-28002: the password will expire within 5 days

Connected.

 [oracle@sujeet ~]$ sqlplus / as sysdba

SQL> alter user system identified by password;

User altered.

SQL> conn system/password

Connected.
2) Set PASSWORD_LIFE_TIME of the profile assigned user to UNLIMITED then 
change the password to avoid it permanently.

SQL> SELECT PROFILE FROM dba_users WHERE username = 'system';

PROFILE
--------------------------------------------------------------------------------
DEFAULT

SQL> SELECT  LIMIT FROM DBA_PROFILES WHERE PROFILE='DEFAULT' AND RESOURCE_NAME='PASSWORD_LIFE_TIME';

LIMIT
--------------------------------------------------------------------------------
180

 [oracle@sujeet ~]$ sqlplus / as sysdba

SQL> ALTER PROFILE DEFAULT LIMIT PASSWORD_LIFE_TIME UNLIMITED;

Profile altered.

SQL> SELECT ACCOUNT_STATUS FROM DBA_USERS WHERE USERNAME='system';

ACCOUNT_STATUS
--------------------------------
OPEN

SQL> conn system/password

Connected.

Issue Resolved.


ORA-04031

ORA-04031: unable to allocate 4064 bytes of shared memory ("shared pool","select increment$,minvalue,m...","sga heap(3,0)","kglsim heap")

Solution:-

# ps -ef|grep oracle


find the smon and kill the pid for it.

# Kill -9 

SQL> startup mount
ORACLE instance started.
Total System Global Area 4831838208 bytes Fixed Size 2027320 bytes Variable Size 4764729544 bytes Database Buffers 50331648 bytes Redo Buffers 14749696 bytes Database mounted. SQL>

SQL> alter system set shared_pool_size=100M scope=spfile;

System altered.

SQL> shutdown immediate

ORA-01109: database not open
Database dismounted. ORACLE instance shut down.

SQL> startup

ORACLE instance started.
Total System Global Area 4831838208 bytes Fixed Size 2027320 bytes Variable Size 4764729544 bytes Database Buffers 50331648 bytes Redo Buffers 14749696 bytes Database mounted. Database opened.

SQL> create pfile from spfile;

File created.

OR

Oracle 11G

For implementation in Oracle 11g startup database in mount mode:

$ export ORACLE_SID=[instance]
$ sqlplus sys as sysdba

SQL> startup mount
ORACLE instance started.
Total System Global Area 1000189952 bytes
Fixed Size                  1337492 bytes
Variable Size             708839276 bytes
Database Buffers          285212672 bytes
Redo Buffers                4800512 bytes
Database mounted.

SQL> alter system set memory_max_target=2000m scope=spfile;
System altered.

SQL> alter database open;
ORACLE instance started.
Total System Global Area 1000189952 bytes
Fixed Size                  1337492 bytes
Variable Size             708839276 bytes
Database Buffers          285212672 bytes
Redo Buffers                4800512 bytes
Database mounted.
Database opened. 

SQL> alter system set memory_target=1600m;
System altered.

Oracle 10G

 For implementation in Oracle 10g startup database in mount mode:

$ export ORACLE_SID=[instance]

$ sqlplus sys as sysdba

SQL> startup mount
ORACLE instance started.
Total System Global Area 1000189952 bytes
Fixed Size                  1337492 bytes
Variable Size             708839276 bytes
Database Buffers          285212672 bytes
Redo Buffers                4800512 bytes
Database mounted.

SQL> alter system set sga_max_size=2000M scope=spfile;
System altered.

SQL> alter database open;
ORACLE instance started.
Total System Global Area 1000189952 bytes
Fixed Size                  1337492 bytes
Variable Size             708839276 bytes
Database Buffers          285212672 bytes
Redo Buffers                4800512 bytes
Database mounted.
Database opened. 

SQL> alter system set sga_target=1600m scope=spfile;;

System altered.

Issue resolved.

The referenced database doesn't contain a valid management Repository.


OMS 13c agent installation failed with "The referenced database doesn't contain a valid management Repository."

Cause :-

Generally this error comes when the database we are using as OMS database was already used as a database for OMS installation before or A failed OMS installation already happened using this database.


Error:-
The referenced database doesn't contain a valid management Repository.


Solution :-

we have to properly clean the database before using it again as a OMS database :-

Below steps I did to clean my database :-

1. Drop sysman related schemas.

[ACSDB@acs-oem13c ~]$ . .bash_profile
[ACSDB@acs-oem13c ~]$ sqlplus / as sysdba

SQL> DROP USER SYSMAN CASCADE;

User dropped.
SQL> DROP USER SYSMAN_OPSS CASCADE;

User dropped.

SQL> DROP USER SYSMAN_MDS CASCADE;

User dropped.

SQL> DROP USER SYSMAN_STB CASCADE;

User dropped.

SQL> DROP USER SYSMAN_BIPLATFORM CASCADE;

User dropped.


SQL> DROP USER SYSMAN_RO CASCADE;

User dropped.

2. Remove Synonyms related to sysman accounts :-

DECLARE
  CURSOR l_syn_csr IS
    SELECT 'DROP ' ||
      CASE owner
        WHEN 'PUBLIC'
          THEN 'PUBLIC SYNONYM '
        ELSE 'SYNONYM ' || owner || '.'
      END ||
      synonym_name AS cmd
    FROM
      dba_synonyms
    WHERE
      table_owner IN (
        'SYSMAN',
        'SYSMAN_MDS',
        'MGMT_VIEW',
        'SYSMAN_BIP',
        'SYSMAN_APM',
        'BIP',
        'SYSMAN_OPSS',
        'SYSMAN_RO'
      );
BEGIN
  FOR l_syn_rec IN l_syn_csr LOOP
    BEGIN
      EXECUTE IMMEDIATE l_syn_rec.cmd;
    EXCEPTION
      WHEN OTHERS THEN
        dbms_output.put_line( '===> ' || l_syn_rec.cmd );
        dbms_output.put_line( sqlerrm );
    END;
  END LOOP;
END;
/


PL/SQL procedure successfully completed.


3. Removing remaining Objects and tablespaces :-


SQL> DROP USER mgmt_view CASCADE;

User dropped.

SQL> DROP TABLESPACE mgmt_ecm_depot_ts INCLUDING CONTENTS AND DATAFILES CASCADE CONSTRAINTS;

Tablespace dropped.

SQL> DROP TABLESPACE mgmt_tablespace   INCLUDING CONTENTS AND DATAFILES CASCADE CONSTRAINTS;

Tablespace dropped.

SQL> DROP TABLESPACE mgmt_ad4j_ts      INCLUDING CONTENTS AND DATAFILES CASCADE CONSTRAINTS;

Tablespace dropped.


4.  As proper database cleaning using RepManager dropall didn't happen, so we have to clean up the registry details :-

DELETE
  FROM
    schema_version_registry
  WHERE
    (comp_name,owner) IN (
      ('Authorization Policy Manager','SYSMAN_APM'),
      ('Metadata Services','SYSMAN_MDS'),
      ('Oracle Platform Security Services','SYSMAN_OPSS')
    );

2 rows deleted.
SQL> commit;

Commit complete.

SQL> ALTER SYSTEM SET optimizer_dynamic_sampling = 0 SCOPE=both;

System altered.


How To Resize the Online Redo Logfiles

1. First see the size of the current logs:

> sqlplus /nolog
SQL> connect / as sysdba

SQL> select group#, bytes, status from v$log;
GROUP# BYTES STATUS
———- ———- —————-
1 1048576 INACTIVE
2 1048576 CURRENT
3 1048576 INACTIVE

Logs are 1MB from above, let’s size them to 10MB.

2. Retrieve all the log member names for the groups:

SQL> select group#, member from v$logfile;

GROUP# MEMBER
————— —————————————-
1 /usr/oracle/dbs/log1PROD.dbf
2 /usr/oracle/dbs/log2PROD.dbf
3 /usr/oracle/dbs/log3PROD.dbf

3. Let’s create 3 new log groups and name them groups 4, 5, and 6, each 10MB in size:

SQL> alter database add logfile group 4  '/usr/oracle/dbs/log4PROD.dbf' size 10M;
  SQL> alter database add logfile group 5  '/usr/oracle/dbs/log5PROD.dbf' size 10M;
   SQL> alter database add logfile group 6  '/usr/oracle/dbs/log6PROD.dbf' size 10M;
4. Now run a query to view the v$log status:

 SQL> select group#, status from v$log;
GROUP# STATUS
--------- ----------------
1 INACTIVE
2 CURRENT

3 INACTIVE

4 UNUSED

5 UNUSED

6 UNUSED

From the above we can see log group 2 is current, and this is one of the
smaller groups we must drop. Therefore let’s switch out of this group into
one of the newly created log groups.

5. Switch until we are into log group 4, so we can drop log groups 1, 2, and 3:

SQL> alter system switch logfile;
** repeat as necessary until group 4 is CURRENT **

6. Run the query again to verify the current log group is group 4:

SQL> select group#, status from v$log;

GROUP# STATUS
——— —————-
1 INACTIVE
2 INACTIVE
3 INACTIVE
4 CURRENT
5 UNUSED
6 UNUSED

Note: redo log Group 1 or 2 or 3 can be active after “alter system switch log file”
which means could not be dropped, in this case,
you need to do “alter system checkpoint” to make redo log groups 1,2 and 3 inactive.

7. Now drop redo log groups 1, 2, and 3:

SQL> alter database drop logfile group 1;
SQL> alter database drop logfile group 2;
SQL> alter database drop logfile group 3;

Verify the groups were dropped, and the new groups’ sizes are correct.

SVRMGR> select group#, bytes, status from v$log;

GROUP# BYTES STATUS
——— ——— —————-
4 10485760 CURRENT
5 10485760 UNUSED
6 10485760 UNUSED

8. At this point, you consider taking a backup of the database.

9. You can now go out to the operating system and delete the files associated
with redo log groups 1, 2, and 3 in step 2 above as they are no longer
needed:

% rm /usr/oracle/dbs/log1PROD.dbf
% rm /usr/oracle/dbs/log2PROD.dbf
% rm /usr/oracle/dbs/log3PROD.dbf

How to resize redo logfile group in Oracle RAC.

1. First see the size of the current logs:

SQL> select group#, bytes, status from v$log;

GROUP# BYTES STATUS
———- ———- —————-
21 1073741824 INACTIVE
22 1073741824 CURRENT
23 1073741824 INACTIVE
24 1073741824 INACTIVE
25 1073741824 INACTIVE
26 1073741824 INACTIVE
27 1073741824 INACTIVE
28 1073741824 ACTIVE
29 1073741824 CURRENT
30 1073741824 INACTIVE
31 1073741824 INACTIVE
32 1073741824 INACTIVE

12 rows selected.

Logs are 1GB from above, let’s size them to 500MB.

2. Retrieve all the log member names for the groups:

SQL> select group#, member from v$logfile;

GROUP#
———-
MEMBER
——————————————————————————–
31
+DATA/prod/onlinelog/group_31.391.787059447

32
+DATA/prod/onlinelog/group_32.390.787059453

21
+DATA/prod/onlinelog/group_21.258.787054781

22
+DATA/prod/onlinelog/group_22.256.787054787

23
+DATA/prod/onlinelog/group_23.274.787054793

24
+DATA/prod/onlinelog/group_24.273.787054799

25
+DATA/prod/onlinelog/group_25.271.787054805

26
+DATA/prod/onlinelog/group_26.394.787054839

27
+DATA/prod/onlinelog/group_27.395.787054845

28
+DATA/prod/onlinelog/group_28.396.787054851

29
+DATA/prod/onlinelog/group_29.397.787054855

30
+DATA/prod/onlinelog/group_30.398.787054861
12 rows selected.
3- Let’s create 3 new log groups per instance and name them groups 40,41,42 and 50,51 and 52 and each 500MB in size:

SQL> ALTER DATABASE ADD LOGFILE THREAD 1 GROUP 40 '+DATA' SIZE 500m;
Database altered.

SQL> ALTER DATABASE ADD LOGFILE THREAD 1 GROUP 41 '+DATA' SIZE 500m;
Database altered.

SQL> ALTER DATABASE ADD LOGFILE THREAD 1 GROUP 42 '+DATA' SIZE 500m;
Database altered.

SQL> ALTER DATABASE ADD LOGFILE THREAD 2 GROUP 50 '+DATA' SIZE 500m;
Database altered.

SQL> ALTER DATABASE ADD LOGFILE THREAD 2 GROUP 51 '+DATA' SIZE 500m;
Database altered.

SQL> ALTER DATABASE ADD LOGFILE THREAD 2 GROUP 52 '+DATA' SIZE 500m;
Database altered.

4. Now run a query to view the v$log status:

SQL> select group#, bytes, status from v$log;
GROUP# BYTES STATUS
---------- ---------- ----------------
 21 1073741824 INACTIVE
 22 1073741824 CURRENT
 23 1073741824 INACTIVE
 24 1073741824 INACTIVE
 25 1073741824 INACTIVE
 26 1073741824 INACTIVE
 27 1073741824 INACTIVE
 28 1073741824 ACTIVE
 29 1073741824 CURRENT
 30 1073741824 INACTIVE
 31 1073741824 INACTIVE
 32 1073741824 INACTIVE
 40 524288000 UNUSED
 41 524288000 UNUSED
 42 524288000 UNUSED
 50 524288000 UNUSED
 51 524288000 UNUSED
 52 524288000 UNUSED
18 rows selected.

5. Now drop Unactive redo log group


SQL> alter database drop logfile group 21;
Database altered.

SQL> alter database drop logfile group 23;
Database altered.

SQL> alter database drop logfile group 24;
Database altered.

SQL> alter database drop logfile group 25;
Database altered.

SQL> alter database drop logfile group 26;
Database altered.

SQL> alter database drop logfile group 27;
Database altered.

SQL> alter database drop logfile group 30;
Database altered.

SQL> alter database drop logfile group 31;
Database altered.

SQL> alter database drop logfile group 32;
Database altered.


SQL> select group#, bytes, status from v$log;

GROUP# BYTES STATUS
———- ———- —————-
22 1073741824 CURRENT
28 1073741824 ACTIVE
29 1073741824 CURRENT
40 524288000 UNUSED
41 524288000 UNUSED
42 524288000 UNUSED
50 524288000 UNUSED
51 524288000 UNUSED
52 524288000 UNUSED

9 rows selected.

Output Post Processor (OPP) in oracle R12

What is Output Post Processor?

Concurrent Processing now uses the Output Post Processor (OPP) to enforce post-processing actions for concurrent requests.Post-processing actions are actions taken on concurrent request output. An example of a post-processing action is that used in Concurrent Processing support of XML Publisher.
If a request is submitted with an XML Publisher template specified as a layout for the concurrent request output, then after the concurrent manager finishes running the concurrent program, it will contact the OPP to apply the XML Publisher template and create the final output.

OPP runs as a service that can be managed through Oracle Applications Manager (OAM) from the System Activity page (Navigation: Applications Dashboard > Applications

Service (from the dropdown list) > Go).

The integration of XML Publisher within Concurrent Processing is done by means of a specialized concurrent manager called the Output Post Processor (OPP). If a request is submitted which has an XML Publisher template specified as a layout for the output, then after the concurrent manager finishes running the concurrent program, it will contact the OPP to apply the XML Publisher template and create the final output.

An overview of the actions involved:

1. An application user submits an XML Publisher based report.
2. The standard concurrent manager processes the request.
3. The XML data file is generated by the standard concurrent manager. This can be done by various methods:
o Oracle Reports - Report Definition File (RDF)
o XML Publisher Data Template - XML data template linked to the Data Definition
o Any other process that produces XML output
4. A post processing action defines that the output needs to be generated by the Output Post Processor hence it is triggered by the standard manager.
5. The Output Post Processor generates the final report and informs the standard concurrent manager whether that was successful.
6. The standard concurrent manager finalizes the concurrent request.

Processes in OPP:


There should always be at least one OPP process active in the system. If no OPP service is available to process concurrent requests, completed requests that require OPP post-processing will complete with a status of Warning.

One service instance of the OPP service is seeded by default. This seeded OPP service instance has one workshift with one process.

 A concurrent manager contacts an available OPP process when a running concurrent request needs an OPP post-processing action. Concurrent managers use a local OPP process (on the same node) by default, but will choose a remote OPP if no local OPP process is available.


How to Increase the number of Output Post Processors?
1.Log on to Applications with “System Administrator” responsibility.
2.Navigate to Concurrent -> Manager -> Define.
3.Query for the “Output Post Processor” service.
4.Click on “Work Shifts” and increase the number of processes

How to get OPP manager log file location?

$APPLCSF/log/<SID>/FNDOPP####.txt       OR
1,System Administrator > Concurrent > Manager > Administer
2,Search for ‘Output Post Processor’
3,Click the ‘Processes’ button .
4,Click the Manager Log button. This will open the ‘OPP’
Upload the OPP log file.

In some cases, Output Post Processor is not start up and it shows Actual and Target are showing different values when we query for Output Post Processor.
The log files shows that no error message.In this case apply the following possible solution for starting the OPP.


1. Shutdown the internal manager by using adcmctl.sh stop apps/apps
2. Make sure there is no FNDLIBR processe running:
$ ps -ef| grep FNDLIBR OR ps -ef|grep applprod|grep FNDLIBR
3. If there is any FNDLIBR processe please kill it $ kill -9 pid
4. Run cmclean.sql script as document from Note 134007.1
5. Restart the internal manager by using adcmctl.sh start apps/apps

or

How to kill and start Output Post Processor (OPP) Background:

This article explains how to kill OPP and restart the same

Solution:
1,System Administator > Concurrent > Manager > Administer
2,Query "Output Post Processor" -> Processes button
Get the sytem id of "Output Post Processor"
3,ps -ef|grep [system id]
4,kill -9 [system id] in Unix
5,System Administator > Concurrent > Manager > Administer
6,Query "Output Post Processor" -> Restart button

SHRD0014: GLLEZL - process exiting with failure

  SYMPTOMS Journal Import completes with the following error: Error ------ ORA-01653 : unable to extend table GL.GL_IMPORT_REFERENCES ORA-01...